I love vintage. I have been on a vintage kick for about a month now. Actually, longer than that but I never had the nerve to make it and wear it, until I started loosing weight. Yeah, Baby! I lost 5" on my waist. Woot! To celebrate, I sewed myself a lovely dress and jacket. More on that later. My accomplishment today was a lovely black Flower Hat. I dreamed it the other night. Yes, I actually dreamed that I made this hat one night. It is not fun at all. I get excited about a project and all night long I dream I am sewing and making my project. The hubbs has even got up on some mornings asking me what I 'built' that night. He never sleeps well when I am 'building' in my sleep. Evidently, not only am I building in my sleep, I am also, mumbling and twitching. He doesn't sleep well either. So, when I say I designed and sewed hats all night long, I mean just that.
 The first thing I did was cut myself a tear drop shaped piece of buckram, about the size and shape of a shoulder pad. I also cut a piece of black felt about 1/4" larger than the buckram. Save the felt, we will work with it later. I placed a wet wash cloth on a 6" styrofoam ball, then placed the piece of buckram on the wash cloth. To keep the ball from rolling, I placed it in a small dessert dish. I molded the buckram to accept the shape of the ball. I removed the wash cloth and replaced the buckram on the styrofaom ball and let it dry. After it is completely dry, it will regain its former stiffness.

 Now for the felt. Important fact: Use felt from the bolt at a fabric store. Do not use craft felt. You will have wonky looking hat. This is my felt piece. I placed the felt piece over the stiff buckram piece, smoothed it out, and and sewed it around the edges using a 1/4" fold.
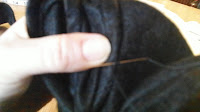
Here is the underside where I stitched the felt to the buckram. This is going to be your hat! That's it. That is all there is to it. Now, we will move on to the decorating part of our hat

I cut 3- 3" strips the length of my felt about 18" long. I cut 6- 18" long strands of 14 gauge wire. This can be found in the jewelry making section of Hobby Lobby. (I would love to live in Hobby Lobby)


The next step is to sew about a 1/4" seam down each side of the felt strip. This will be done to all three pieces of felt.


After the sides are finished, make an itty bitty crook at the end of one of the wires. Thread the wire in the space made by the seam. Do this to both sides.
 Cut the strip in half. You will have to use shears that are strong enough to cut through wire so you don't ruin your good scissors.

Fold the strip in a little raindrop shape. Tack the middle with your machine. Be careful not to run over a wire and break your needle. Ask me how I know!!!! After you machine tack the loop, you will hand sew the bottom of the loops and gather them until the bottom is nice and tight. Do this to only 5 of the strips. You will save one of them for the middle.

After you sew the ends nice and tight, take your pliers and fold the ends under so it looks nice and tidy.

See? Nice, neat, and very pretty. :)

 Now lets take that last strip. We are gonna fold him in half and sew him real tight like we did the bottom of the loops. After the middle is sewn tight sew both ends in the same manner.
Arrange the five loops on the top of the hat. I put two loops at the front of the head, I thought that one in the front looked funny. Tack the loops to the center of the hat.

Here are the two loop I positioned to the front. Now we will sew the loops secure to the rest of the hat. I left a tiny bit un-sewn right at the rim of the hat just in case I decided to add a veil.
Almost done!!! Take that last piece of felt strip. We are going to sew this right in the middle of our hat to cover up all that ugly hand stitching.
 Sew one of the ends at the edge of the middle in a way as to hide the end. Now secure the middle of your strip to the exact middle of you hat. Last secure the final end of you strip to the other side to complete a double loop. Straighten all your loops and fix the loops so they arranged attractively on the hat. Add a lovely hat pin and you are finished!!!!
 If you are interested in purchasing one of this style hat, leave me a comment. The hat is available for $30 plus shipping and handling. I also have hat pins like the one featured in the picture for $10 each.

I added a bit of a tulle veil to it at the request of the young lady who bought it. I think it looks very pretty. You can't tell it from the picture, but there is little flecks of glitter in the veil. Love it.
 The first thing I did was cut myself a tear drop shaped piece of buckram, about the size and shape of a shoulder pad. I also cut a piece of black felt about 1/4" larger than the buckram. Save the felt, we will work with it later. I placed a wet wash cloth on a 6" styrofoam ball, then placed the piece of buckram on the wash cloth. To keep the ball from rolling, I placed it in a small dessert dish. I molded the buckram to accept the shape of the ball. I removed the wash cloth and replaced the buckram on the styrofaom ball and let it dry. After it is completely dry, it will regain its former stiffness.
 Now for the felt. Important fact: Use felt from the bolt at a fabric store. Do not use craft felt. You will have wonky looking hat. This is my felt piece. I placed the felt piece over the stiff buckram piece, smoothed it out, and and sewed it around the edges using a 1/4" fold.
Here is the underside where I stitched the felt to the buckram. This is going to be your hat! That's it. That is all there is to it. Now, we will move on to the decorating part of our hat

I cut 3- 3" strips the length of my felt about 18" long. I cut 6- 18" long strands of 14 gauge wire. This can be found in the jewelry making section of Hobby Lobby. (I would love to live in Hobby Lobby)


The next step is to sew about a 1/4" seam down each side of the felt strip. This will be done to all three pieces of felt.


After the sides are finished, make an itty bitty crook at the end of one of the wires. Thread the wire in the space made by the seam. Do this to both sides.
 Cut the strip in half. You will have to use shears that are strong enough to cut through wire so you don't ruin your good scissors.

Fold the strip in a little raindrop shape. Tack the middle with your machine. Be careful not to run over a wire and break your needle. Ask me how I know!!!! After you machine tack the loop, you will hand sew the bottom of the loops and gather them until the bottom is nice and tight. Do this to only 5 of the strips. You will save one of them for the middle.

After you sew the ends nice and tight, take your pliers and fold the ends under so it looks nice and tidy.

See? Nice, neat, and very pretty. :)

 Now lets take that last strip. We are gonna fold him in half and sew him real tight like we did the bottom of the loops. After the middle is sewn tight sew both ends in the same manner.
Arrange the five loops on the top of the hat. I put two loops at the front of the head, I thought that one in the front looked funny. Tack the loops to the center of the hat.

Here are the two loop I positioned to the front. Now we will sew the loops secure to the rest of the hat. I left a tiny bit un-sewn right at the rim of the hat just in case I decided to add a veil.
Almost done!!! Take that last piece of felt strip. We are going to sew this right in the middle of our hat to cover up all that ugly hand stitching.

 Sew one of the ends at the edge of the middle in a way as to hide the end. Now secure the middle of your strip to the exact middle of you hat. Last secure the final end of you strip to the other side to complete a double loop. Straighten all your loops and fix the loops so they arranged attractively on the hat. Add a lovely hat pin and you are finished!!!!

I added a bit of a tulle veil to it at the request of the young lady who bought it. I think it looks very pretty. You can't tell it from the picture, but there is little flecks of glitter in the veil. Love it.
No comments:
Post a Comment